Friday, July 29, 2011

Little Thrify Makeover


I've confessed recently that I've caught the thrifting bug. 


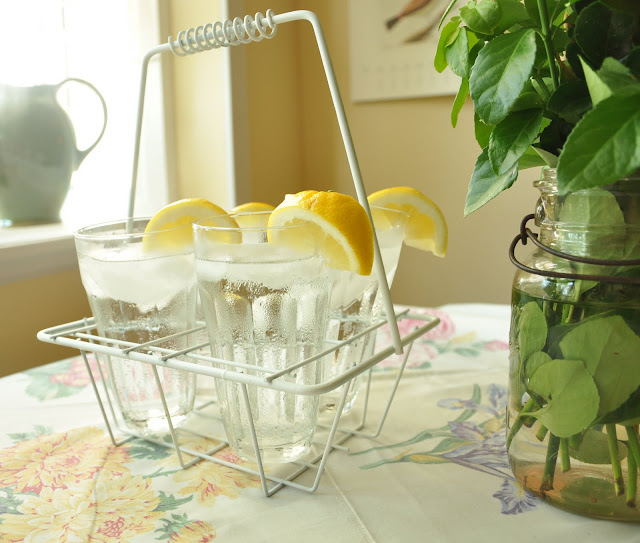
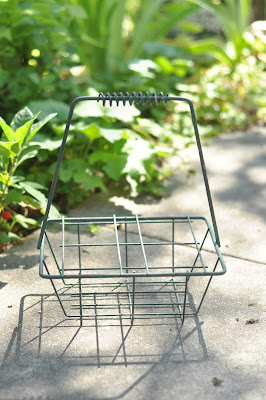
 And here's a little glass caddy I was tickled to find for just 99 cents.


Just needed a little spray paint to cover the evergreen look.


And all ready for duty outdoors or in.


I'm thinking carrying out a caddy full of lemonade or maybe mojitos would make any company quite happy.


See Today's Post {HERE}

"Ice Cream Party for Twins"


{Linking to Friday Fun Finds , Funky Junk InteriorsThrifty Decorating &  
Southern Hospitality}
 

Thursday, July 28, 2011

Quirky Fun Storage Ideas

Having things nice and orderly is such a happy thing, especially when it's cute and fun orderly.

 I am very much on the look out for tea tins.  
I think this sweet idea from Martha could be the solution to my bare refrigerator problem.


 This would be awfully fun too.


 Like this for letters.


Love those wheels.


 Ready to take on any messes today and make them orderly and lovely?
Me too.

Wednesday, July 27, 2011

Her "Cheese" Face

When I ask my little girl for a smile...


She says "cheese" with all the enthusiasm...


and silliness she can muster.


Such a goose.  A sweet goose.


Tuesday, July 26, 2011

New Cheerful Bunting Tut


Here's a bit of new bunting I just made for an upcoming party for the twins.  I love these fabrics and love even more that they were cheap and found at Hobby Lobby.  $3 yard for the mint broadcloth and about $4 a yard for the raspberry check.


This bunting is different from my previous bunting in that I used Double Wide Bias tape and made it two-sided - as in it looks finished from both sides.  For the other bunting I used Single Wide Tape which would have driven me batty to try to fold and pin and sew each bunting piece inside the tape, so I just pinned and sewing the tape to the tops.  For this one the bunting is sewn inside the fold of the bias tape.


Here's my supplies. Though I cut many more pieces than I needed  and actually got three packages of bias tape for a total of 9 yards of bunting.  I used 30 pieces for those 9 yards.{You'll also need pins and thread and a nice mother, sister, or friend who'll let you use her sewing machine...and kindly help you with the bobbin.}


Here you see how nicely the Double Wide tape lays open...and rather sad cuticles.


See how easily the top of the bunting fits inside.  This pinning part really went very quickly.


All nicely tucked inside.


A pile of lovely bunting ready to run through Sister's sewing machine.  Because #1 I don't have a sewing machine and #2 I'm very intimidated by bobbins.  But bobbins aside this is very easy sewing just following the tape straight down.  Took about 10 minutes.


And here she is all ready for a cheerful party...and maybe a little ironing. maybe.


Monday, July 25, 2011

Very Good Gets a Bit Better


Awhile back I posted this - the recipe for my all-time favorite chocolate sheet cake.  Because when I find a recipe I really like and when it's also chocolate I tend to make it again and again,  I made it yet again for a get together this weekend but decided to shake things up a little and add some toasted coconut to the frosting.   
Have you added toasted coconut to chocolate frosting before?  Ah well, then you haven't lived, my friend!  Make sure to understand this is toasted coconut (toasted in a little pan on the stove or on a cookie sheet in the oven) which is an entirely different animal that coconut out of the bag.  It. is. so. delicious.  Try it soon - you won't be disappointed!


Chocolate Sheet Cake

2 1/3 cups whole wheat flour
2 cups sugar
1 tsp baking soda
1 cup butter
1 1/4 cup water
4 T cocoa
1/2 cup buttermilk
2 eggs, beaten
1 tsp vanilla

1. Mix dry ingredients in a bowl.
2. Bring butter, water and cocoa to a boil in saucepan. Pour over dry ingredients. Mix well
3. Add buttermilk, eggs, and vanilla. Beat well.
4. Pour into greased 9x13 pan and bake at 350 for 30 min. or until it tests done.

Frosting:

1/2 cup butter
4 T cocoa
6 T buttermilk
1 tsp vanilla 
1 pound powdered sugar
1/2 cup chopped walnuts (opt)

1. Heat butter, cocoa and buttermilk to boiling. 
2. Remove from heat and mix in vanilla, sugar and nuts.
3. Pour over cake soon after it comes out of the oven.

Optional: For Coconut Frosting, toast about 1 & 1/4 cups sweetened coconut in a pan on top of medium-low heat or in the oven on a cookie sheet (be careful to watch it as it can burn quickly!)  Add into the frosting after it's cooked - you won't regret it!


On an a non-dessert related note, here's picture I happily snapped this weekend of my most wonderful, beautiful sister and her impossibly adorable baby.  She has a very-good-for-my-heart-post at her sweet blog today.


Friday, July 22, 2011

Boy by the Window


It is a very happy thing to manage to get your little boy to stand
by the nice light coming in the window and look at you.


It makes for a rather nice picture-taking opportunity.


Though I missed the boat on this one - just not quick enough to get it in focus.
But I'll keep it.  That blurry smile is too sweet to let go.


There, that's better.


It took these  in the early afternoon with my 50 mm lens. The window faces South.
{just in case you're curious}

Happy picture-taking this weekend!

Thursday, July 21, 2011

Thursday Observations

#1 You know that you've probably been relaxing your personal standards a little too much when...
You decide to put on little make-up and your four-year-old asks "are we going to church today?"


#2 You know that you've probably been relaxing your housekeeping habits a little too much when...
Your husband notices there's an unusual echo in your master bedroom - it sounds "empty"
... because you've finally cleaned out all the mess.


***

So, it's time to step it up a little bit, and I've been trying hard at it.
 My husband may love me whether I wear make-up or not, but he's worth a little more effort.
My children may be happy whether their home is messy or not, but they deserve a better example. 

And one final observation:

It doesn't matter how many cute clothes you might have
...if they are all in the laundry basket, you can't be cute in them.


Three cheers for finally catching up on the laundry, and a cute outfit all ready for wearing.


{Yes, I think ironing is generally for the birds - why do you ask?} 


{Linking to Capturing Motherhood}

Wednesday, July 20, 2011

Magnetic Chalkboard Project Good Times

Here's the pic of the magnetic chalkboard frame I showed you yesterday.  Now here are all good fun details.

 
 It all started with feeling like I really needed a chalkboard in my life and I wanted one on the side of my frig.

Then I found this 24x36 inch frame I found at Hobby Lobby for a very wonderful 80% off.


So that I only had to pay this for it, and it fit the side of my frig perfecto. 


So I got some chalkboard paint at Hobby Lobby (with coupon) and borrowed brother-in-law's industrial stapler.


 I wanted the chalkboard to be magnetic like my frig, so I got a sheet of metal from the plumbing section of Lowes - just happens to come in a 24x36 inch sheet for about $10 dollars - woohoo!  I also got three yardsticks to hold it in place.


 After painting the sheet metal with several coats, I laid it in the frame and stapled the rulers down to the back. 


Like so. 


Voila!


So, my potentially good idea was to attach the frame to my frig with these handy command strips.  So I bought the large ones, used all four and got it up there.  


Here is the only picture I have of it as it - a bad picture, quickly taken late at night - but you get the idea of the nifty-ness.


But about 24 hours later, we heard a resounding crash BOOM

 It was very sad.  I was tempted to try again, but I hate to waste another $4+ dollars to buy more strips as they are not reusable. 


So the board ended up here, and I like it, but I had other plans for here and now my frig looks a bit bare and neglected.  Ah well, I'll probably look at it more in this place...and a helpful reminder or two on it will be good for me to see often :)


Additional notes and disclaimers:
 
*Total cost of project: $31

*Really wanted green chalk paint but Hobby Lobby didn't carry it. Thought I'd checked Michael's but later saw that they do indeed have it.  And maybe it was just my bottle but I did not like using this paint - it kept dripping all over the place.

*The rulers were probably not the best idea.  I was really excited about them being the perfect length (36inches - no saw necessary!), but the sheet metal wobbles a little bit - some kind-of board? on back would maybe stabilize it better?

* And okay, the Command strips said clean surfaces with rubbing alcohol, but I didn't have any so I used....hand sanitizer.  I figured it has alcohol in it, right??  Was this my downfall? ;)

*For some reason the phrase "haste makes waste" kept running through my head through this whole project - perhaps a little more thinking and little less hurry-make-it-and-hang-it! might have been helpful...meh.

*Oh, and definitely rough up your sheet metal before you paint it...did I do this?  Hmmm.  So yes, I'll be revisiting this magnetic chalkboard project. Good grief.

*The "take me here quick, please note" is a hint for my sweetheart that I want to go to the new creperie that just opened in town "Panache".   I haven't been yet, but the menu and fliers have already completely won me over.


Whew, if you made it all they way down here to you are to be commended. :)

And if you decide to tackle this goodtimes project, you might like to whip out a few of these to use on it. :)


Today's post is {HERE}


{Linking to Life Made Lovely & Funky Junk Interiors
Thrifty Decorating}

Tuesday, July 19, 2011

I Made a Magnetic Chalkboard

I made a chalkboard and it is up, but I just realized there is no way I'll be able to take you through the whole DIY saga this morning - just no time to get all the pics together.  So come back tomorrow for the nitty gritty!

For now, here it is next to my desk with a view towards the kitchen.


And looking towards our family room.


Very much in the center of things... providing me with a helpful reminder... when my DIY projects don't turn out quite as I hoped. :)


See today's post with the whole fun DIY story {HERE}


{Linking to Bowl Full of Lemons}


Monday, July 18, 2011

Ice Box Cake

Remember the part in Disney's Pollyanna when she's at the bazaar and Cook hands her a big piece of fluffy cake, layered cake?  Yes, well that image has stuck with me for about 25+ years, and in my mind that cake is just like this wonderful cake of my mother's - Ice Box Cake.  

It is just about my favorite cake ever {chocolate must come very first}.  
It's a simple, wonderful, fluffy, yummy, yummy cake, and it's my mum's very special, rather top secret recipe.


Which means I can't exactly tell you how to make it.  But I'll give you some good hints..because no one should miss out on a piece of this four-layered-deliciousness.

Especially when it starts out with something as easy as a box yellow cake mix.  Yes, a box.  I have tried in vain to make a homemade yellow cake - it turned out just too dense for this recipe.  So revel in homemade goodness every other day, but today make up a box of yellow cake mix and put it in two 9 inch pans.


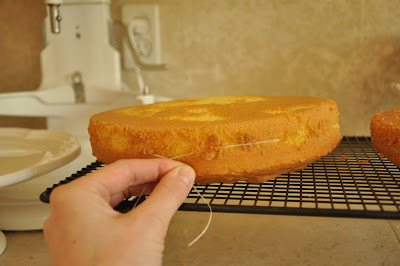
 Here are not the most helpful photos showing you how I use string (or floss in a pinch) to divide one cake into two layers. Do this for both cakes for a total of four layers.
{wrap the string around the middle, cross like pictured and then pull ends through the cake.  Yikes, does that make any sense???}


Do this for both cakes, for a total of four layers.


So obviously, the frosting is the secret, but I'll give you all the ingredients and I just know you'll figure it out. 

Start with a good bit {a lot} of this.

 And then add some of this...


And a little of this.  Getting the idea?

Then layer it all up like so... and around the sides.
And chill {the "Ice Box" part} for at least a few hours - making it a day ahead is best.
And serve straight from the fridge.


Then take your Lovely Ice Box Cake off the the bazaar to share with your family and friends.


And be sure to play the glad game. :)