Showing posts with label photography. Show all posts

Friday, March 30, 2012

Photo Session: Logan

Been cutting back on photography lately, but loved taking for this sweet family to mark their boy's first birthday.


I thought mom did such a great job with their outfits - everyone in jean with grey and blue tops, red accents.  
Love her happy red shoes.


That bit of red shirt just gives their little man that perfect amount of pop right around his face.


And then the red was perfect with Logan's adorable racer. I've never seen one of these in person (I think it's from Land of Nod) but it was so cute and he loved riding it.


So sweet. So fun.


Wednesday, February 1, 2012

Photography Notes: Editing Tips

When I started this little photography series a month ago, I'd planned to show you some photo-editing tips using a free program called Picnik.  In the last week or so, Picnik has announced that they are discontinuing service April 1st. : (

I'm still going to show you how to use Picnik today, because it is a great way to get used to tweaking your photos even for just a couple months and I think you could transfer what you learn.  I will be on the lookout for a comparable replacement and hopefully share with you in the future. Maybe I'll even share about Photoshop Elements...

So I love to use Picnik for casual editing because it is so user-friendly and it's esp. nice for blogging, because it automatically re-sizes pictures, making them easy to quickly upload. 

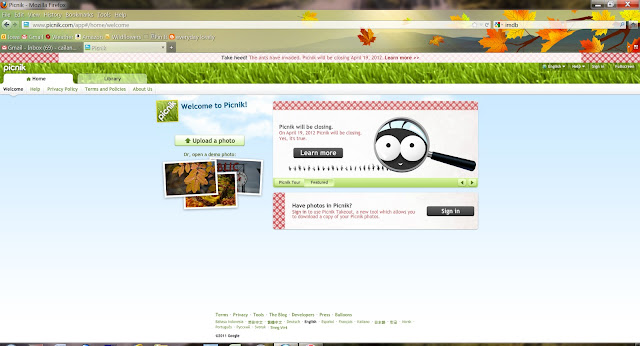
So first, go to www.picnik.com.  You find a screen like this.  
Click on the "upload a photo" button and locate your picture file you want to edit.


My photo shows up like this.  It needs to be rotated.  The rotate feature is under "Basic Edits". 


 I also often use the "Straighten" pictures to right pictures that are slightly wonky.


 My next step is usually to go to "Sharpen" and adjust the "Clarity".  Here I adjusted to 23%, which is kind-of high.  Usually 12% or 15% is a enough to crisp the image just right.


 Then I go to "Exposure" (also under "Basic Edits").  Here, it's just time to play around.  For this photo I put my Exposure to 4; Highlights to 11; Shadows to 0; Contrast to 19.  Usually I do a little less highlight and contrast.


 Now go to "Effects".  My go to effect is "Cross Process"  When you first click on it, your photo will look like this.


 So I fade Cross Process down to 91%.  This is about right for most images to brighten them and add a little drama without turning them yellow.


Sometimes, I'll use the "Vingette" effect. But take the size down to 32%, Strength to 0% and Fade to 73%, for just a touch of framing.


 Since we're here I'll show you how I add the white border for my picture gallery.
Go to the "Frames" tab under "Edit" and choose "Border".   The Border color is auto-black, so click on the color square which will open up your color options from which you can choose white. 


Then put both the Outer and Inner Thickness to 100%. This will give you a nice thick border.  Like I use {HERE}.


 Finally, go the the "Save & Share" tab to save your image.  Always save it as a copy!


Whew!  I hope that was a little helpful.  Perhaps at least a place to get your feet wet if you've never done much editing before. 

In other news, hurray for February!  So glad it's here, it's such a lovely month.
Time to get a little Valentine's cheer about the house. : )


Tuesday, January 31, 2012

Baby Photo Session: MinJee

 Goodness. This was lovely fun.
It was my first real "newborn" shoot, and forced me to get a little creative as you can't quite take a newborn outdoors for pictures...especially a sweet nekkid one. : )


I took all of these pictures on my bed upstairs in the afternoon. 
I get nice light from west and north-facing windows. 
And then I draped by four-poster bed with white sheets, and voila! a little studio.
Recognize that pillow?


It's been awhile since I spent some time around a newborn.  I was so awed by how little she is. After awhile you forget how little your three-year-olds started out.


That little yawn!


And feet!


Sigh. I think I want one.


I love that momma wore her pearls.


If you live in the Ft. Collins, Loveland, Greeley {Colorado} area and you would like to plan a photo session just for you, email me at everydaylovelyblog@gmail.com  for info.

See portfolio {HERE}.

Thursday, January 26, 2012

Photography Notes: Picture Taking Tips 2

So today I'm going to continue my little photography tips series.  Remember that I'm not an expert, even a real professional at this, but like many of you, I love photography and as I have sorted through a little bit of the technique I thought I'd share what I've learned.

Today I'll share three picture-taking rules/tips in regard to Layout:
the Rule of Thirds, Lines, and Framing.


The Rule of Thirds

The rule of thirds is basically dividing what you see through your lens into thirds, and placing your subject in the top, bottom, right or left third.  Here's a (very) rough idea of what I'm talking about.  You want your subject to be close to one of the points where the the lines meet.
  In other words, don't put your subject in the center. Not that it's a crime, but it's generally true that putting your subject dead on center makes for a less pleasing composition.  Off center adds balance and makes your subject more captivating. 

See here is my little Gideon pretty much on dead center.  I still really love it (the fence helps give some weight to the left, adding balance ) and will keep it because he's cute, but...


 Here he is moved into the right third of the photo.


Here's some other examples.


 I use this rule with my home and food shots too.


 Lines

  Next we have Lines.  This is a technique involving using lines you find in your setting to draw attention to your subject.  It makes for a much more dynamic picture.

Lines in fence leading to face.


Box lines leading to cute feet.


 Grass line leading you from brother to siblings.


Always lots of lines at a park - slides are great.  Here swing lines lead you to subject.


 Another fence line.


Railroad track lines.


Framing

Finally, we have the Framing technique.  Like with Lines you look for ways you can frame your subject in order to bring your eye to the subject more dynamically.  I haven't challenged myself much creatively with this one,  but here are a few examples.

Here parents frame the baby. 


 Same idea here.


Peek-a-boo face.


 Hopefully this was a bit helpful.   Next Wednesday, I'll share a bit about photo-editing.

Until then, happy picture-taking to you. : )

You can find the rest of the series:
{HERE}  Photography Notes: About My Camera

{HERE} Photography Notes: Photo-Taking Tips I